ITK Pre-Processing Algorithm Wrappers in Python
m |
m |
||
| Line 72: | Line 72: | ||
| Resample | | Resample | ||
| itkResampleImageFilter | | itkResampleImageFilter | ||
| + | |- | ||
| + | |[[ITK_Pre-Processing_Algorithm_Wrappers_in_Python/AnisotropicDiffusionVesselEnhancementFilter|Anisotropic Diffusion Vessel Enhancement]] | ||
| + | | AnisotropicDiffusionVesselEnhancement | ||
| + | | itkAnisotropicDiffusionVesselEnhancementImageFilter | ||
|} | |} | ||
Revision as of 16:28, 27 July 2009
Introduction
There are various pre-processing algorithms in the Insight Segmentation and Registration Toolkit (ITK). Python wraps for these algorithms exist; however, from a user's perspective, it is complicated and not so easy to run these algorithms. We intend to provide a Python script that can be used for invoking the Python wrappers to many of these algorithms, using a very simple interface. The user can just specify the smoothing algorithm to be used. For the parameters, the user can give the name of an XML file containing details of the algorithm, or alternatively, enter the details using a simple GUI. This page contains details about the algorithms that can be run using these scripts, and on how to run these scripts.
Here is a list of the pre-processing algorithms that have been added to the interface.
| Algorithm Name | Algorithm key | ITK Class Name |
|---|---|---|
| Mean | Mean | itkMeanImageFilter |
| Median | Median | itkMedianImageFilter |
| Laplacian | Laplacian | itkLaplacianImageFilter |
| Smoothing Recursive Gaussian | SmoothingRecursiveGaussian | itkSmoothingRecursiveGaussianImageFilter |
| Grayscale Erode | GrayscaleErode | itkGrayscaleErodeImageFilter |
| Grayscale Dilate | GrayscaleDilate | itkGrayscaleDilateImageFilter |
| Flip | Flip | itkFlipImageFilter |
| Normalize | Normalize | itkNormalizeFilter |
| Shift and scale | ShiftScale | itkShiftScaleImageFilter |
| Sobel Edge Detection | SobelEdgeDetection | itkSobelEdgeDetectionImageFilter |
| Sigmoid | Sigmoid | itkSigmoidImageFilter |
| Gradient Anisotropic Diffusion | GradientAnisotropicDiffusion | itkGradientAnisotropicDiffusionImageFilter |
| Curvature Anisotropic Diffusion | CurvatureAnisotropicDiffusion | itkCurvatureAnisotropicDiffusionImageFilter |
| Curvature Flow | CurvatureFlow | itkCurvatureFlowImageFilter |
| Min-max Curvature Flow | MinMaxCurvatureFlow | itkMinMaxCurvatureFlowImageFilter |
| Resample | Resample | itkResampleImageFilter |
| Anisotropic Diffusion Vessel Enhancement | AnisotropicDiffusionVesselEnhancement | itkAnisotropicDiffusionVesselEnhancementImageFilter |
How to run the scripts?
Requirements All the scripts are written in Python, and to run these one must have a version of Python installed in their machine. In addition, one should also have an installation of ITK along with the Python wrappers using CSwig enabled. For more details about how to install ITK with the Python wraps, please visit the ITK Python Wrapping page. Please note that the Python that is used for running the scripts mentioned in this page, and the Python version used in the ITK installation should be the same. Ensure that the Python version used is built using the same (or at least compatible) compiler that is being used to build ITK. Once these are setup, we move to actually run the scripts. You would also need to install the latest version of the Python module 'wxPython' for the GUI. Version 2.8 of wxPython was found to be working.
Execution The main script is smooth.py, which is the function to be called. Based on the arguments to the function, the user will be asked to enter the parameters to the algorithm. There are two ways of executing the scripts -
- 1. Not specifying parameters - in the method, the user does not specify the parameters, and the script will ask the user to input the algorithm of choice, and also the parameters. There are multiple ways of running the script. Here are a couple of ways.
python smooth.py
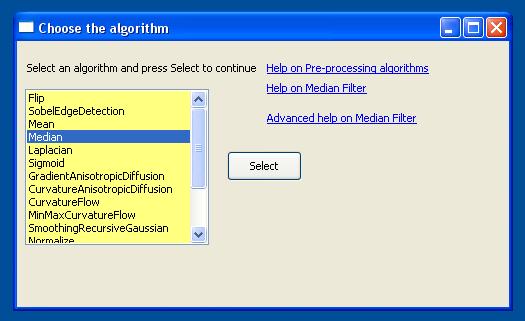
- This is the simplest way of implementing the code, assuming the user is in the same directory as the file smooth.py. Else the user will have to specify the path to the file smooth.py. This command will initiate a GUI that will ask the user to input an algorithm of choice. A URL is available on the right side of the page (currently points to this page) for help with the wrappers. On selecting an algorithm, two more URLs appear - one (Help) providing a link to the wiki page for the corresponding filter, and the other (Advanced help) providing a link to the corresponding section in the ITK Software Guide. Once the user selects the algorithm, he/she presses the OK button to continue. A screenshot of the GUI is shows in Fig. 1. The figure shows the user having selected the median filter.
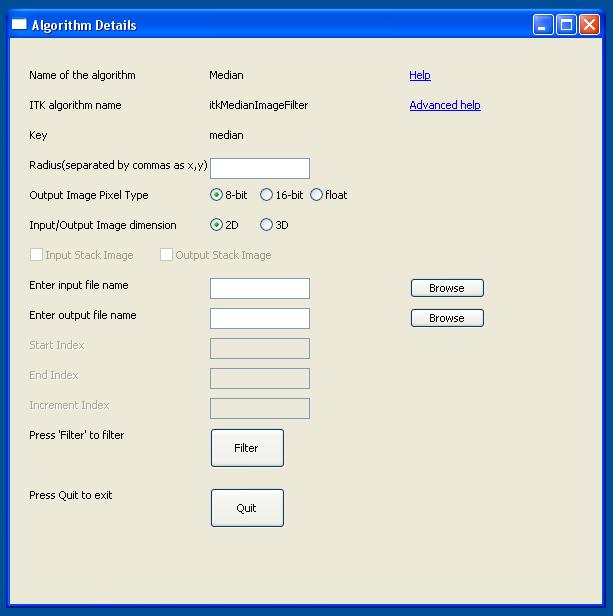
- On selecting the filter, the interface now requests the user to enter the parameters of the algorithm. An example (for the sigmoid filter) is given in Fig. 2. Note that there are a lot of entries in the page. We describe each one of them below.
- 1. Name of the algorithm - this describes the name of the algorithm, or how the algorithm is commonly known.
- 3. ITK algorithm Name - the name of the class in ITK that implements the filter/algorithm.
- 2. Key of the algorithm - the key to the algorithm is used to access the algorithm details (the user need not worry about this for the time being).
- 3. URL for help - on the right side, a URL is present for help on the filter chosen. It directs the user to the Wiki page corresponding to that filter.
- 3. Advanced Help URL - this URL directs the user to the section in the ITK Software Guide corresponding to the current filter.
- 4. Parameters - the next few lines show the various parameters of the algorithm and request the user to enter the values. For the time being, we have not implemented checks for the validity of the input in the scripts. In case a wrong value is entered, the ITK code will catch it and an error will be returned. The
- On selecting the filter, the interface now requests the user to enter the parameters of the algorithm. An example (for the sigmoid filter) is given in Fig. 2. Note that there are a lot of entries in the page. We describe each one of them below.
- 5. Output Image Pixel Type - this describes the image pixel type in the output image. For example, by choosing "8-bit" the user is expecting the output image to be store each pixel intensity in 1 byte. Note that only certain image formats are compatible with the float data-type.
- 6. Input/Output image dimension - in the algorithms that are being considered, the input and output image dimensions are the same. This parameter gives the user the option to choose the dimension of the image.
- 7. Input stack image and Output stack image - if the input/output image dimension is 3, then these check-boxes are activated and allow the user to input an image or output an image as a stack.
- 8. Input file name/format - the name of the input file to be processed. The user can either type the path of the file, or use the "Browse" button to open a file dialog box from which he/she can choose the file name. Note that for image stacks, the user should enter the image file format in this column. For example, if the image files are named img0001.png, img0002.png, and so on, the format would be img%04d.png, where img is the prefix of the name, 04 indicates that the indices occupy 4 digits, and the leading digits are filled with zeros, and the extension of the files in png. The path will still have to be specified.
- 9. Output file name/format - this is the name of the ouput file name. The description is similar to the Input file name above.
- 10. Start, End, and Increment Indices - these are activated when either the input or the output stack image check-boxes are selected. For example, if a user had a stack of 50 input images, with names img0001.png, img0002.png, ..., img0050.png, the start, end, and increment indices would be 1, 50, and 1, respectively.
- 11. Filter Button - once all the parameters have been selected, the user should press the Filter button to start the filtering operation.
- On pressing the filter button, all the details about the algorithm including the input and output file details are stored in an XML file (default name parameters.xml). Then this XML file is read and the algorithm is implemented. This XML file is created so that for future runs, all the details need not be entered.
python smooth.py filterName
- The second way to call the script without specifying the parameters is shown above, where filterName is the name of the filter requested by the user (if the user knows the name of the filter). Note that the filter name is not case sensitive, but cannot contain any spaces. In this case, the user directly jumps to the window asking for details about the algorithm and the parameters. For example, the filter name could be one of the keys described in the table listing all the algorithms implemented.
python smooth.py filterName inputFilename outputFilename
- The user is also allowed to specify the input and the output file names (or formats if using stacks). The result would be that the user would jump to window similar to the one shown in Fig. 2, with the names of the filter, and the input and the output file names already chosen.
- 2. Specifying the parameters - the second way to choose the parameters is to directly pass the XML file containing the details of the algorithm. The syntax would be
python smooth.py XMLFilename
- The XML filename should contain all the details of the algorithm, including the parameters. As we don't have any other way of accessing the algorithms (as of now), one way to get an XML file in the correct format is to run the algorithm once (with the GUI, as shown above) and recover the parameters.xml file that is created by default. Then the parameter values in this file can be modified for that particular algorithm and can be passed as the argument.
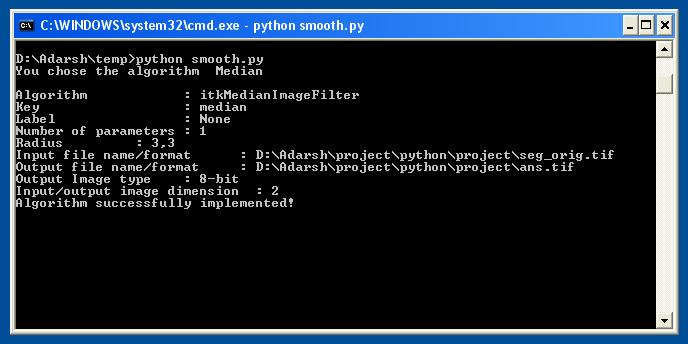
On successful completion of the algorithm, the script outputs the details of the algorithm in the prompt (as shown in Fig. 3; example shown for the median filter).
Enter New Algorithm
Each algorithm is described by a filter name and some parameters. Most pre-processing algorithms follows a very similar sequence of instructions for execution. Once we know what parameters are required for a particular algorithm, we can get these from the users and execute the algorithm. A list of algorithms that are available to be executed through the interface is available in an XML file called SmoothingAlgorithms.xml'. This file also contains the details of each algorithm.
An algorithm can be added to the list of algorithms using the EnterAlgorithm script. The syntax for this would be
python EnterAlgorithm.py
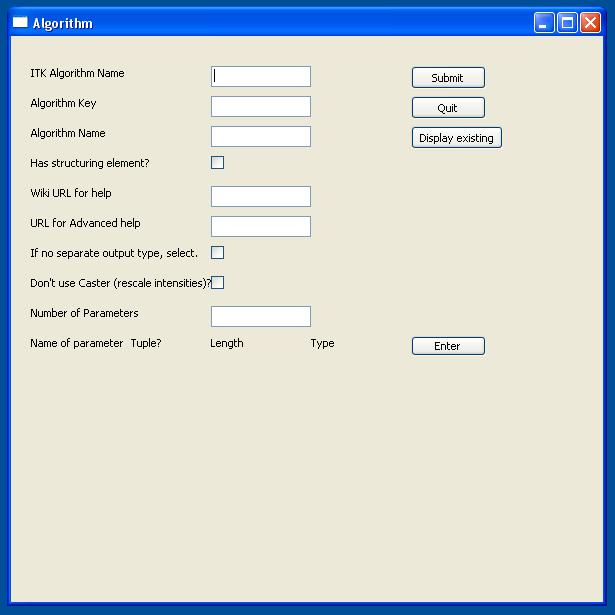
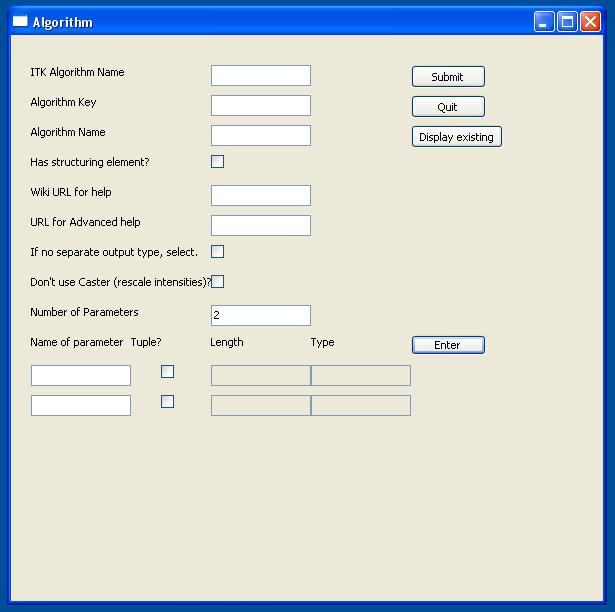
This will initiate a GUI whose screenshot is given below in Fig. 4.
The description of the entries are given below:
- ITK Algorithm Name - name of the ITK filter to be used for performing the filtering operation. For eg., this entry should be itkMeanImageFilter for the mean filter.
- Algorithm Key - this is a short keyword for the algorithm to be used. This key will be used to identify the algorithm in all the scripts, and should describe the algorithm. For the mean filter, we use the key "mean". It should be in small letters.
- Algorithm Name - this describes the name (label) of the filter displayed to the user. This should be related to the key in the following way - if the name is converted into lower case, the name and the key should match.
- Has structuring element - check this box if the algorithm uses a structuring element. For example, Grayscale Erode/Dilate use structuring element.
- Wiki URL for help - this gives the Farsight Wiki URL that gives a brief description of the algorithm.
- Advanced help URL - this gives a link to the ITK Software Guide that gives a detailed description of the algorithm of interest.
- No separate output type - some of the filters do not have an explicit output type - for example, the flip filter returns an output image of the same pixel type as the input image.
- Don't use caster - for some filter, such as normalize and shiftscale, we don't rescale the image intensities to the output image pixel type. For such filter, we need to check this box.
- Number of parameters - the number of parameters for the filter/algorithm should be entered here. Following this, one should press enter to display a list of boxes where the details of the algorithm can be entered. For example, if the types 2 parameters and presses Enter, the window will pop up as below in Fig. 5.
- Parameters - the first column should contain the name of the parameter. The second column contains a checkbox to indicate if the algorithm is a tuple parameter, meaning whether it contains an array of values. If this box is checked, two more entry boxes are enabled which should contain the length of the array (currently not used, because for most algorithms, it is same as the dimension of the image) and the ITK type of the array. For example, for the mean filter, the only parameter is Radius. The ITK type used for the radius itkSize.
Source Code
All the scripts for the interface are written in Python. For a brief description of the code, please check here.
