FARSIGHT Tutorials/Building Software/Bio-Formats/MacTutorial
This step-by-step guide is intended to be used by developers of the FARSIGHT and Bio-Formats projects. The goal of this tutorial is to download and build all the required source code and components for these two projects. At the end of this tutorial, you should be able to easily make modifications to the source code and rebuild your solutions.
This tutorial is specifically designed for the Mac and was created on OSX 10.6.4. There are analogous tutorials for Windows and Linux.
If you only need to use FARSIGHT for image analysis and don't need to make modifications to source code see the user-only tutorial section.
If you have any problems during this process, please contact the bio-formats team.
Contents |
Prerequisites
This tutorial will use MacPorts and Subversion. It also assumes you have a C++ compiler installed. If any of these are not installed on your computer:
Use MacPorts to install Subversion
Use MacPorts to install the G++ compiler via the terminal command:
sudo port install gpp
Environment Variables
The Bio-Formats ITK plug-in requires several environment variables to be set. You can permanently set these variables by editing the profile being used by your terminal, or they can be manually set for a given session using the command:
export <variable_name>=<new_value>
In addition, this tutorial will require an environment variable to be set. For convenience, this section serves as a reference place all of these variables and their values. If you have already set these variables, you may disregard instructions regarding them in the tutorial.
The variables are as follows:
- ROOT_DIR=<path_to_top_level>
- ITK_AUTOLOAD_PATH=$ROOT_DIR/loci/bioformats/components/native/bf-itk/build/dist/bf-itk/
- DYLD_LIBRARY_PATH=$ROOT_DIR/loci/bioformats/components/native/bf-itk/build/dist/bf-itk/
Farsight
Step 1: Organize your Directories
There is a significant amount of code for both of these projects, with a number of dependencies. It will be extremely helpful to organize your code in a meaningful way. Additionally, the instructions in this tutorial will assume a specific hierarchy of directories when indicating where to download or install certain components.
In particular, it is assumed that there is a specific <path to directory>/ where you will create a farsight/ and loci/ folder. A good path to use, if your username is jsmith, would be /home/jsmith.
First we need to set an environment variable to this top-level directory. Whichever path you pick, from your terminal, execute the following command, replacing the angle-bracketed text with the path to your chosen top-level directory:
export ROOT_DIR=<path_to_top_level>
This allows us to use $ROOT_DIR in all future instructions when specifying target paths. Note: this tutorial assumes your <path_to_top_level> does not include a trailing "/".
Next, you should now create a series of folders representing the following directory structure:
Step 2: Download the Source Code
In this step we will download the source code for FARSIGHT and Bio-Formats, and the components upon which these projects depend (ITK, VTK, VXL and Jace).
Download and extract the following projects' source code into your $ROOT_DIR/farsight directory:
- VXL - Use version previous to current build. Last tested v 1.13.0
- ITK - Last tested v 3.20.0
- VTK - Last tested v 5.6.0
In your terminal, use the following commands to check out Jace, Bio-Formats and FARSIGHT, respectively, from their Subversion repositories:
svn checkout -r 39 https://jace.svn.sourceforge.net/svnroot/jace/trunk $ROOT_DIR/loci/jace
svn checkout http://dev.loci.wisc.edu/svn/software/trunk $ROOT_DIR/loci/bioformats
svn checkout svn://www.openworld.rpi.edu/repos/farsight/trunk $ROOT_DIR/farsight/farsight
Note: this will provide you with the most recent trunks of Bio-Formats and FARSIGHT. If you want to download all the branches, testing data, etc... remove the /trunk from the first command argument paths.
Note: Jace revision 39 is the most recently tested and confirmed revision that works with Bio-Formats. Later versions will break your builds.
Step 3: Install Supporting Software
There are several software packages, used either by the installation scripts or the FARSIGHT/Bio-Formats source code, which you will need to install before building and installing the source code downloaded in step 2. If you already have a given component installed, you don't have to re-install it (if your version is appropriate).
Note: If you do not use this tutorial to install QT or Boost, make a note of the path to their directories. This path will be needed in the next step.
- CMake - In your terminal, execute the command:
sudo port install cmake
- QT - Download the LPGL licensed Mac installer from this location. "Framework Only" should be fine. Last tested version - 4.7.0. Run the .dmg file and install QT. When prompted, use the default path for installing QT.
- Boost - Download the Unix extension release package from this location. This should be a zipped file, and all you need to do is extract the contents (a "boost-<version>" folder) into your
$ROOT_DIR/farsightdirectory.
Step 4: Install FARSIGHT
This section will install the core FARSIGHT modules to the appropriate itk, vtk, vxl and ftk directories in your $ROOT_DIR/farsight/farsight/build/ path. By default, this will only build the Nucleus Editor module. If you would like to enable more modules, edit the FTK.cmake file in $ROOT_DIR/farsight/farsight/cache/ and set the desired modules to "ON."
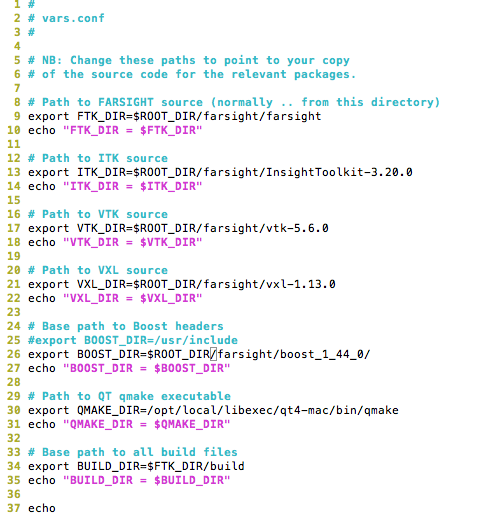
Before you can build FARSIGHT you need to edit the vars.conf file in $ROOT_DIR/farsight/farsight/cache. If you have been following the file structure of this tutorial, you should edit the file to look like this:
Note: if you are using more recent versions of any of these components than those indicated in Step 2, make sure to update your folder path as appropriate.
After editing your vars.conf file, in the terminal navigate to $ROOT_DIR/farsight/farsight/cache/ and execute the command:
bash build-all.sh
to begin the build process for farsight. This will take some time. Alternately, you can also use the individual build-XXX.sh scripts to build each component manually. You must build in the order:
- VXL
- ITK
- VTK
- FTK
When the build finishes, you will have a working copy of FARSIGHT. To test it, from the terminal execute the command:
$ROOT_DIR/farsight/farsight/build/ftk/exe/NucleusEditor.app/Contents/MacOS/NucleusEditor
This will open the Nucleus Editor module, which should be able to process a basic set of image types.

Note that, currently, multi-dimensional images aren't fully supported (the t-slider isn't working). Furthermore, if you try to open an unsupported image type, you will see a "NO IMAGEIO WAS FOUND" message in the terminal. FARSIGHT is built on ITK, which automatically supports plug-ins by checking an ITK_AUTOLOAD_PATH environment variable. The next steps will cover BF-ITK installation and provide such a plug-in to handle additional image types.
Troubleshooting
If any of the builds fail, the most likely culprit is in a CMakeLists.txt specification. Follow these steps from within the terminal to manually edit the cmake settings for the failed module:
- Delete the contents of
$ROOT_DIR/farsight/farsight/build/<dest dir>, where <dest dir> is the build directory of the build that failed. When manually editing cmake settings, this directory should always be cleared so cmake-related files are freshly generated. Otherwise, your changes may not take effect. - Navigate to
$ROOT_DIR/farsight/farsight/build/<destdir>where <destdir> is the build directory of the build that failed. - Execute the command:
ccmake $ROOT_DIR/farsight/<sourcedir>
where <sourcedir> is the source directory of the build that failed. - If advanced mode is OFF, press "t" to toggle to advanced mode.
- Use this page as a guide to change your settings.
NOTE: make sure to leave BUILD_SHARED_LIBS in ITK set to "ON." - When you want to try building again, press "c" to configure and then "g" to generate. Then, run the appropriate build script in
$ROOT_DIR/farsight/farsight/cache.
Bio-Formats
Step 5: Install BF-CPP
FARSIGHT is written in C++ while Bio-Formats is written in Java. This step bridges the gap between these languages by installing the C++ bindings for the Java method equivalents with the help of Jace. In the terminal:
- Navigate to
$ROOT_DIR/loci/bioformats/and execute the command:
ant tools
- Then, navigate to
$ROOT_DIR/loci/bioformats/components/native/bf-cpp/and execute the command:
ant -Djace.home=$ROOT_DIR/loci/jace
Troubleshooting
If you see a message saying: "error: jni.h: No Such file or directory" in the terminal output, this is likely because your path linking was broken in a recent Mac update. The fix requires downloading an OS X Java update. To do so:
- In a web browser, navigate to connect.apple.com
- Create an account if necessary (the free developer account is sufficient) and log-in.
- On the right-hand side of the page is a series of navigation links. Click the one for "Java."
- Download the "Java for Mac OS X 10.6 Update 3 DeveloperPackage" .dmg file and install it.
Step 6: Install BF-ITK
This step will create the actual libraries that constitute the BF-ITK plug-in using the bindings created in the previous step. In your terminal, navigate to
$ROOT_DIR/loci/bioformats/components/native/bf-itk and execute the command:
ant -Djace.home=$ROOT_DIR/loci/jace -Ditk.home=$ROOT_DIR/farsight/farsight/build/itk
If this build is successful, execute the command:
ant -Djace.home=$ROOT_DIR/loci/jace -Ditk.home=$ROOT_DIR/farsight/farsight/build/itk dist
Note: these two commands can be combined using:
ant -Djace.home=$ROOT_DIR/loci/jace -Ditk.home=$ROOT_DIR/farsight/farsight/build/itk compile dist
Troubleshooting
If you see a message saying: "error: jni.h: No such file or directory" in the terminal output, see the step 5 troubleshooting section.
For any other issues, review the specific BF-CPP guide.
Step 7: Use FARSIGHT with BF-ITK
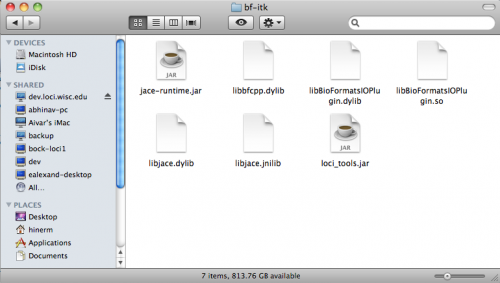
Your $ROOT_DIR/loci/bioformats/components/native/bf-itk/build/dist/bf-itk folder should now look like this:
These files essentially are the BF-ITK plug-in. For FARSIGHT (or other ITK-based modules) to use Bio-Formats, you must specify the ITK_AUTOLOAD_PATH environment variable. You can do so in the terminal via the command:
export ITK_AUTOLOAD_PATH=$ROOT_DIR/loci/bioformats/components/native/bf-itk/build/dist/bf-itk/
Then open the Nucleus Editor again, as you did at the end of Step 4. When you open an image you should see a series of debug statements in the terminal which provide some general information about the image being opened. In the Editor itself, T and Z slices should now be separated properly.
Furthermore, you can now open any image type supported by Bio-Formats. In the following sequence of images, a *.ids format image is opened with the Nucleus Editor using Bio-Formats. Then, the BF-ITK plug-in is turned off with the terminal command
export ITK_AUTOLOAD_PATH=""
and the same image is opened again:


